Visual Novel Translation Tutorial

Step 1: Download Google Chrome

Links:  Google Chrome

I use Google Chrome throughout this tutorial. If you don't have it, download Chrome with the above link and install it. Other browsers may also work.

Step 2: Change Locale to Japanese

Japanese visual novels are usually programmed with Japanese computers in mind. In order to run them, it is often necessary to use Japanese system locale (i.e. information technology standards). One way to do this is to change the default Windows system locale setting to Japanese.

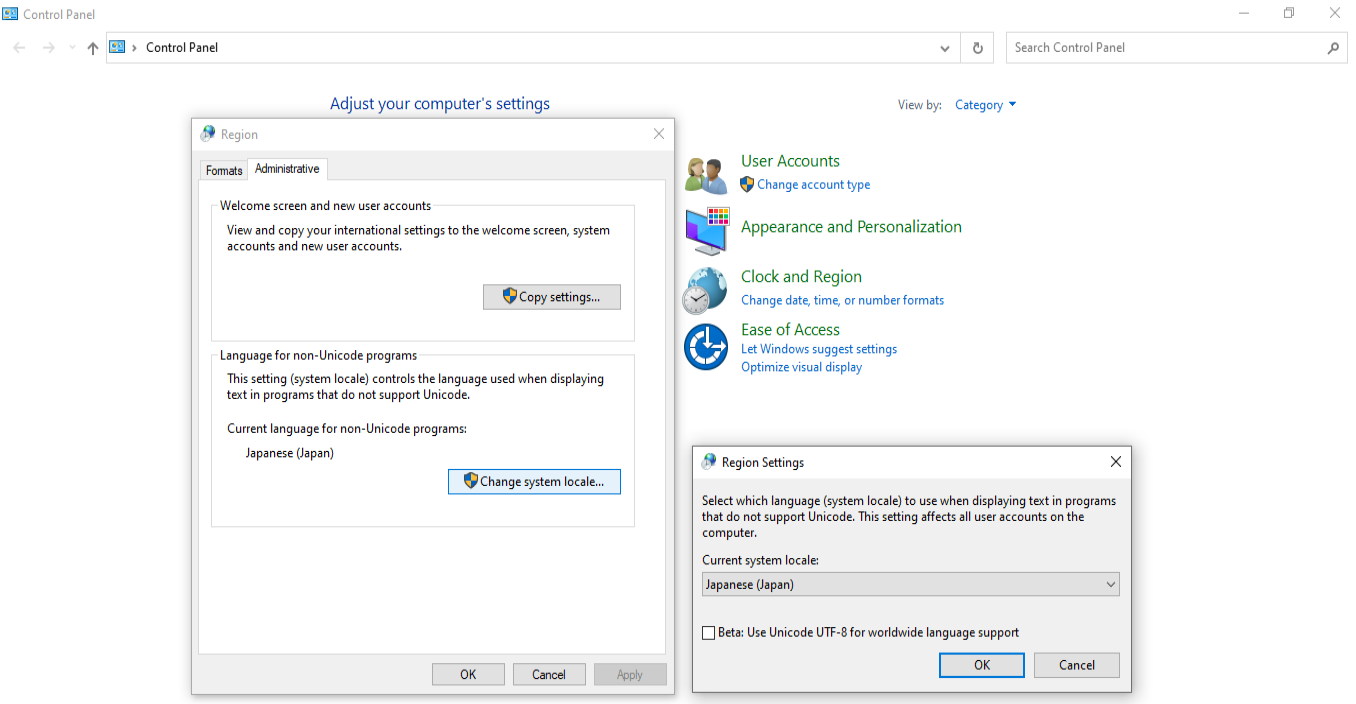
You can do so by following these steps:

  1. Open the Control Panel
  2. Click on Change date, time or number formats under  Clock and Region
  3. Switch to the Administrative tab in the top menu.
  4. Under Language for non-Unicode programs, click Change system locale...
  5. Find Japanese (Japan) in the dropdown menu and click OK (do not check the checkbox that says Beta: Use Unicode UTF-8 for worldwide langauge support).

At this point, you will need to restart your computer for changes to take effect.

Some visual novels may also require that the Region Date and Time format be set to Japanese in order to launch correctly; however, there is no need to do so for this tutorial. This would be done in the first dropdown in the Formats menu.

Step 3: Download a Visual Novel

Links: Houkago no Futekikakusha

In this tutorial I will be installing the free demo version of the 18+ Japanese visual novel called Houkago no Futekikakusha.

Download the demo version, accesible at the following url:
http://www.nostalgicchord.com/products/houkago/download/houkago_wab_trial_re.zip

Once the file has downloaded to your machine, extract the zipped folder by right clicking on it in File Explorer and choosing the Extract All... option. Open the extracted folder and navigate down until you see the main game folder, which looks like this:

Right click the application file 放課後の不適格者.exe (with a red and black icon) and choose Send To  and then Desktop (create shortcut) .

At this point, you should be able to launch the game by double-clicking on the newly created desktop shortcut.

Step 4: Download Textractor

Links : Textractor

Textractor is a program that allows you to extract text from games as you are playing them. Download the latest Textractor release, accesible at the following url: https://github.com/Artikash/Textractor/releases/download/v5.2.0/Textractor-5.2.0-Setup.exe

Once you have downloaded it, extract the files and run Textractor-X.X.X-Setup.exe which should prompt you to install the program.

After installation is complete, open the new Textractor folder and navigate into the x86 folder. You should see an application file called Textractor.exe with a green and red icon:

Create a desktop shortcut by right-clicking it, choosing Send To and then Desktop (create shortcut)

At this point, you should be able to start Textractor by double-clicking on the newly created desktop shortcut.

Step 5: Add Chrome Extensions

Links: RikaikunClipboard Inserter

Rikaikun is a Chrome extenstion to help translate Japanese text word-by-word. Clipboard Inserter is a Chrome extenstion to insert contents of your copy-paste clipboard into the browser. Go to both of the above links and click Add to Chrome. Then click on the Chrome Extensions button (looks like a puzzle piece) and pin the extenstions to your bookmarks bar with the thumbtack icon.

Right click the Clipboard Inserter extension and select Options. Change Container selector to div and Timer interval to 100. It should look like this:

Step 6: Open a Reading Page

Links: My Reading Page, Additional Reading Page

We will be reading the visual novel in the browser by using Clipboard Inserter to inject text into an HTML page. I have provided a link to the reading page that I use, as well as an additional reading page that provides some customization options (not created by me). Please open either reading page in a new window.

On the new window, click on the Clipboard Inserter extension and the Rikai-kun extension to turn them on.

Step 7: Start Reading!

Launch Textractor and your visual novel by double clicking the shortcuts on your desktop.

Upon launching Textractor, you will see multiple windows open. Ignore all of them except the main window which looks like this:

In this menu, click Attach to Game on the top left. Choose 放課後の不適格者.exe and click OK. Please note that you may need to choose a different option from this menu if you are not using the trial version. 

In your visual novel, start a new game with the option 最初から始める:

In the Textractor main menu, click on the dropdown at the very top. This is a list of all text outputs from your game. Open the menus one-by-one until you find the menu that has Japanese text in it  corresponding to the line in your visual novel.

Open your reading page next to your visual novel. Now, as you progress through the visual novel, the text should also appear on the reading page. If you hover over a Japanese word in the reading page, you should see a translation thanks to Rikaikun.

Step 8: Configure Textractor

Links: DeepL Developer Plan

In the Textractor main window click on the Extensions button. Right-click on the Regex Filter extension and click Remove extension. Likewise, remove the  Google Translate extenstion.

Next, right-click on the white space and click Add extension then select DeepL Translate.xdll and click Open. Drag the DeepL extension directly above the Copy to Clipboard extension.

You will now see a new DeepL Translate window appear when you open Textractor. Here are the parameters that I use:

Navigate to the DeepL website and create a developer account. There are currently two choices, the DeepL API Free plan and the DeepL API Pro plan. The free plan should be enough for ample reading as it lets you translate up to 500,000 characters per month for free.

Once you have signed up, go to the Account tab of the Account page. If you scroll down you will see an Authentication Key for DeepL API.

Copy this key into the API key field in your Textractor DeepL Translate window.

At this point, open a reading page. The translation will now be provided by DeepL instead of Google Translate.

Additional Information

Textractor has a suite of additional settings and extensions that you may find useful. For example, it has a draggable text-box that you can move over your game. Here is a video tutorial on Textractor.

There is a Chrome extenstion called Yomichan that can be used in place of Rikaikun to provide additional customization and integrations. Many people prefer this over Rikaikun.

There is a program called Sugoi Translator that can be used with Textractor to obtain similar results to what I did here. I have used the program before, and it works well, but I still personally prefer to use the method outlined here instead of Sugoi Translator. However, Sugoi Translator has numerous useful functions such as offline translation and more. Here is a video that can help you get started with Sugoi Translator.

It is possible to use an emulator such as Locale Emulator to mimic Japanese system locale instead of switching your Windows default system locale.

You can purchase the full ​Houkago no Futekikakusha game here (I recommend using PayPal).

If you would like, you can download my HTML Reading Page and customize it. You can change the font, colors, orientation, and other stuff with HTML and CSS. Right click and view page source on my Reading Pages to see the source code. Save the source code to a local HTML file and make your desired changes. Once you are done, simply open your HTML page with Google Chrome and that file can be used as your new Reading Page. You will also need to go the the Clipboard Inserter extension and switch ​Allow access to file URLs ​from off to on.